


BASS PLAYING-POSITION PROCESS IN DETAIL


SET THE END-PIN
If a Rock-Stop is available, place it on the floor directly in front of you.
Slowly lift the Bass only an inch or two off the ground in order to set the tip of the end-pin into the Rock-Stop. If you do not have a Rock-Stop, set the end-pin on the floor.
Always feel the weight of the Bass flowing through the end-pin to the floor.

STAND WITH BASS
While leaving the end-pin securely set, stand up with the bass. You should be positioned behind the bass.
Stand with excellent posture. You will see the back of the bass and the bass’s neck.

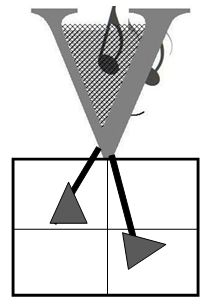
STEP TO SIDE
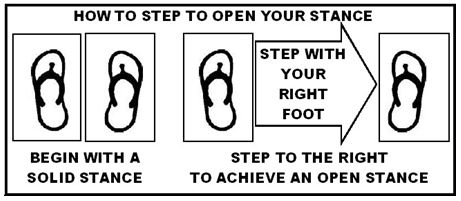
Keep your Shoulders directly over your feet.

EMBRACE THE BASS
You will be spending a lot of time practicing your bass. It is a good idea to hug it now.
While you remain hugging the bass, perform the Leverage-Step!

PERFORM THE LEVERAGE-STEP

Place your arms over the Bass’s Sloped-Shoulders and wrap them around the upper-bouts. Be certain that the Bass’s neck is on the left side of your head.
Remain balanced and poised.
Take a deep breath, and feel the control and leverage that you have over the bass.

GLIDE TO A GROUNDED POSITION
Now, take another slow breath. As you exhale, slowly glide the top of the bass towards you!
While performing the step you also began the process of the final step.
Pivot the instrument so as to make gentle contact with you, left of your center.
Be sure to keep clearly in mind all the reference locations you learned earlier.
IT IS NOW TIME TO PERFORM A MENTAL CHECK-LIST!